Breakfast

Blueberry Banana Frittata

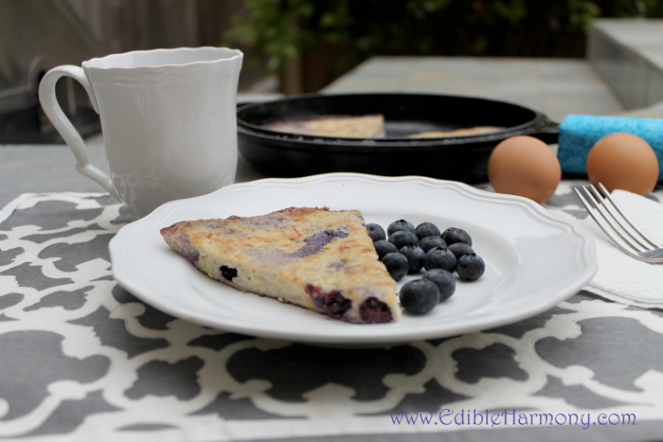
This Blueberry Banana Frittata was inspired by one of my most popular breakfast options: “The Banana Scramble” … The perfect healthy fix for a “sugary” breakfast, yet it is protein rich, nutrient dense and really simple and fast to make. My girls just absolutely love it and they ask for it everyday, but after a year plus of having the same breakfast almost daily, I got a little bored and decided to start experimenting with the recipe and adding different ingredients.

I know that the sounds of mixing bananas with eggs doesn’t seem appetizing at first, but if you think about it, eggs and sweeteners are basic ingredients in baking. If you mix the eggs very well with the rest of the ingredients you are not be able to taste them or see them.

The same thing happens here after you mix in the eggs with the banana– it really tastes like some sort of banana bread pudding but it is lot easier to make.

To make this frittata I used my oven to finish cooking the top, but depending on your large-pancake-flipping skills you may get away with cooking the top of the frittata in the pan as well. I’ll give you some tips on how to do it at the end of the recipe but if you are using a cast iron or heavy skillet, this step might be more challenging.

For other sweet breakfast  ideas try my grain-free oatmeal, cream of chocolate, or crispy paleo waffles.

Blueberry Banana Paleo Pancakes

Ingredients:

3 bananas
5 eggs
1/3 cup of almond flour or 2-3 tablespoons of coconut flour
1 tsp of vanilla
½ cup of fresh blueberries
2 tbsp of coconut oil

Preparation:

  • Preheat oven to 450 degrees Fahrenheit. (Read below for a no-bake method)
  • In a medium bowl mash the bananas.
  • Mix in the eggs and whisk until very well combined.
  • Mix in the flour and the blueberries.
  • In a medium oven-safe skillet heat the coconut oil on the stove over medium/low heat.
  • Pour the mixture in the pan.
  • Cook uncovered until the middle of the frittata is cooked.
  • Put the frittata in the oven and cook until is fully done.
  • Turn the broiler on to brown the top (optional step).

Steps to flip the frittata into the pan (No-bake method):

  • Cook one side until the frittata is firm and at least two-thirds of it are cooked.
  • Cover the top of the pan with a large plate.
  • Hold the plate firmly while you turn the pan upside down to drop the frittata onto the plate.
  • Return the pan to the stove and slide the frittata back into the pan with the cooked side up.
  • Continue cooking until it is fully done.

Sweet Paleo Breakfast

Appetizer · Sauces and Dips

Baba Ganoush

Baba Ganoush is a traditional Middle Eastern appetizer.  It is a dip similar to hummus, but it is made with roasted eggplant (aubergine), instead of chickpeas or garbanzo beans. It is also lighter and creamier. It is usually served with pita bread, but I use it to dip my veggies in. It tastes great with carrot sticks, celery stalks, cucumber slices, or raw cauliflower florets. I also use it as a salad dressing, diluted with some more oil and vinegar, or as a sandwich spread, in wraps or over grilled veggies.

To make this, I first bake the entire eggplant on high heat, until it’s very soft and the skin is charred. I don’t worry about cutting it, peeling it, or trimming the ends of it before I place it in the oven, because I am only going to use the inside part of it. The charring of the skin gives it a little smoky flavor and leaving the eggplant uncut prevents it from drying out. Then I puree it with a food processor, if you don’t have a food processor you can use a mortar and pestle to mash it, but the baba ganoush will be a little “seedy”.

Ingredients:

1 large eggplant (about 2 lbs)

1/3 cup of lemon juice

1/3 cup of tahini

1/4 tbsp of ground cumin

3 garlic cloves

Salt to taste

1-2 tbsp of olive oil

Chopped flat-leaf parsley or fresh mint and Kalamata olives for garnishing (optional)

Preparation:

  • Pre-heat oven to 475 degrees Fahrenheit.
  • Bake the whole eggplant until very soft (it takes about 45 minutes), don’t worry about burning the skin.
  • Wait for it to cool down and remove the peel.
  • Using a food processor or an immersion blender blend the eggplant flesh, lemon juice, garlic, tahini, cumin and salt until a puree is formed.
  • Transfer to a bowl, drizzle with olive oil and garnish with parsley and olives and serve as a dip.
Baba Ganoush
Recipe Type: Appetizer
Cuisine: Paleo
Author: Edible Harmony
Prep time:
Cook time:
Total time:
Serves: 6-8
Ingredients
  • 1 large eggplant (about 2 lbs)
  • 1/3 cup of lemon juice
  • 1/3 cup of tahini
  • 1/4 tbsp of ground cumin
  • 3 garlic cloves
  • Salt to taste
  • 1-2 tbsp of olive oil
  • Chopped flat-leaf parsley or fresh mint and Kalamata olives for garnishing (optional)
Instructions
  1. Pre-heat oven to 475 degrees Fahrenheit.
  2. Bake the whole eggplant until very soft (it takes about 45 minutes), don’t worry about burning the skin.
  3. Wait for it to cool down and remove the peel.
  4. Using a food processor or an immersion blender blend the eggplant flesh, lemon juice, garlic, tahini, cumin and salt until a puree is formed.
  5. Transfer to a bowl, drizzle with olive oil and garnish with parsley and olives and serve as a dip.
Sauces and Dips

Homemade Roasted Tomatoes

Homemade Roasted Tomato Recipe

I recently found a great deal on organic tomatoes, which is actually rare at this time of the year. I went ahead and bought several pounds of them and after a few salads, some Bolognese sauce, pisto and just about every single tomato recipe I could handle in a week, I decided it was time to preserve them, so I made a large batch of homemade roasted tomatoes and froze it in small containers. I am sure this recipe can be canned as well, but I haven’t done much experimenting with that food preserving method yet.

Did you know that cooking tomatoes actually increases their disease fighting properties? Lycopene, an antioxidant found in tomatoes changes its structure when is heated making it easier for our bodies to absorb. Lycopene has been shown to have properties that may help prevent tumor growth, improve cardiovascular health, prevent macular degeneration and helps prevent oxidative damage by free radicals.

For this homemade roasted tomato recipe I used Roma tomatoes, fresh oregano and fresh thyme, but it can be made with any kind of tomatoes and different spices. This makes about a quart, so make a double or triple batch as desired

Ingredients:

4 lbs of very ripe tomatoes
3 sprigs of fresh oregano
2 sprigs of fresh thyme
3 sliced garlic cloves
2-3 tbsp of olive oil, coconut oil or avocado oil
Salt and pepper to taste

Preparation:

  • Preheat oven to 400 degrees Fahrenheit.
  • Cut the tomatoes in half and place in a large bowl.
  • Remove the oregano and thyme leaves from the stem and add to the bowl along with the rest of the ingredients, and combine.
  • Place the tomatoes face down on a baking dish or cookie tray.
  • Bake tomatoes for about 30-40 minutes or until the skin on the tomatoes looks wrinkled.
  • Pinch off the skin of the tomatoes (optional) and can or freeze for later use.
Homemade Roasted Tomatoes

Author: Edible Harmony
Prep time:
Cook time:
Total time:
Serves: 1 quart
Ingredients
  • Ingredients:
  • 4 lbs of very ripe tomatoes
  • 3 sprigs of fresh oregano
  • 2 sprigs of fresh thyme
  • 3 sliced garlic cloves
  • 2-3 tbsp of olive oil, coconut oil or avocado oil
  • Salt and pepper to taste
Instructions
  1. Preheat oven to 400 degrees Fahrenheit.
  2. Cut the tomatoes in half and place in a large bowl.
  3. Remove the oregano and thyme leaves from the stem and add to the bowl along with the rest of the ingredients, and combine.
  4. Place the tomatoes face down on a baking dish or cookie tray.
  5. Bake tomatoes for about 30-40 minutes or until the skin on the tomatoes looks wrinkled.
  6. Pinch off the skin of the tomatoes (optional) and can or freeze for later use.
Salads · Side Dish

Easy Sauerkraut

Pickled Cabbage (Easy Sauerkraut)


Fermented vegetables are gaining popularity due to their beneficial bacteria and their role in improving digestion and strengthening the immune system. This easy sauerkraut is the most basic fermented cabbage recipe, but feel free to combine it with other vegetables such as carrots, onions, ginger, cauliflower, cilantro, jalapeños, green chilies, Brussels sprouts, greens, beats, turnips, etc or spices such as dill, caraway seeds, cayenne or red pepper, or celery seeds.

It is believed that the consumption of fermented cabbage originated in China over 2000 years ago and then brought to Europe by nomadic tribes . Today many different countries enjoy this probiotic rich staple: the French eat choucroute, the Germans sauerkraut and the Koreans kimchi.

Sauerkraut provides a high density source of a wide range of beneficial live bacteria which assist in the digestive process, without this beneficial bacteria our digestive system becomes a home to harmful parasites and yeasts, resulting in the condition of candida. More and more studies agree that most disease originates in your digestive system. This includes both physical and mental disease. (read more about it here: http://articles.mercola.com/sites/articles/archive/2013/01/02/digestive-system-gut-flora.aspx or here : http://www.naturalnews.com/033659_sauerkraut_health_benefits.html#ixzz2Gtg91ukB ).

For other cabbage recipes try my cabbage unrolled.

Ingredients:

1 head of cabbage
2 garlic cloves, sliced or pressed (optional)
1 tbsp of sea salt or celtic salt

Preparation:

  • Remove one cabbage leave and set aside.
  • Shred or thinly slice the cabbage.
  • Place cabbage in a bowl and add the salt.
  • Using your hands squeeze and knead the cabbage to draw out as much moisture as possible. Make sure you are using a fresh cabbage, older cabbages have less moisture.
  • Add the garlic or optional ingredients.
  • Transfer the cabbage and the juice into a mason jar.
  • Put the reserved cabbage leave on top.
  • Push the sauerkraut down so that it is completely covered with cabbage juice, if necessary combine a couple of ounces of water with the cabbage juice, but it works better if you only use the juice.
  • Put a lid on loosely tightened and allow it to ferment outside of the fridge for about a week Make sure the cabbage is always under the brine to prevent mold. if necessary hold it down with a paper weight.
  • Refrigerate and eat

Easy Sauerkraut

Easy Sauerkraut

Recipe Type: Fermented Vegetables
Cuisine: Paleo
Author: Edible Harmony
Serves: 4
Ingredients
  • 1 head of cabbage
  • 2 garlic cloves, sliced or pressed (optional)
  • 1 tbsp of sea salt or celtic salt
Instructions
  1. Remove one cabbage leave and set aside.
  2. Shred or thinly slice the cabbage.
  3. Place cabbage in a bowl and add the salt.
  4. Using your hands squeeze and knead the cabbage to draw out as much moisture as possible. Make sure you are using a fresh cabbage, older cabbages have less moisture.
  5. Add the garlic or optional ingredients.
  6. Transfer the cabbage and the juice into a mason jar.
  7. Put the reserved cabbage leave on top.
  8. Push the sauerkraut down so that it is completely covered with cabbage juice, if necessary combine a couple of ounces of water with the cabbage juice, but it works better if you only use the juice.
  9. Put a lid on loosely tightened and allow it to ferment outside of the fridge for about a week Make sure the cabbage is always under the brine to prevent mold. if necessary hold it down with a paper weight.
  10. Refrigerate and eat
Breakfast · Desserts · Vegetarian

Banana Pumpkin Frittata


//
http://pagead2.googlesyndication.com/pagead/show_ads.js
Although it’s been several days since Halloween, I am still eating the remnants of my Jack-O-Lantern!  Breakfast, lunch, and dinner have all been pumpkin-based– I never get tired of eating pumpkin. Today we had a chili cook-off at my daughter’s school, and while I haven’t had chili in a very long time, there was one version that was gluten-free, grain-free, and Paleo-friendly.  It was nice to finally find a no-bean chili among the contestants.  Although there was only one version I could eat, I came back with some great ideas for Paleo chilies, among them: pumpkin turkey chili, beef brisket chili, ground beef and bacon chili; so if you are a fan of this Tex-Mex dish, stay tuned!  In the next several weeks, I will be experimenting and creating some new versions that will be strong contenders for your next chili-cook off—best of all, nutritious and delicious!

Back to the banana pumpkin frittata, while perhaps the thought of eggs with banana may sound unappealing or odd to some, it is actually like a big flowerless pumpkin pancake, similar to one of my all time favorite recipes: banana scramble, but with an autumn-inspired, Halloween-based twist.

Because my bananas weren’t too ripe yet, I added some lucuma powder to  make it sweeter and to give it more color, but I have made it without it and it is delicious still. Lucuma powder is considered a healthy alternative sweetener it comes from a south american fruit and it is very low in sugars. It is naturally rich in beta-carotene, niacin, and iron.

Ingredients

2 tbsp of coconut oil
1 ½ cups of shredded pumpkin
3 eggs
2 bananas
½ tbsp of pumpkin spice
1 tsp of cinnamon
2 tbsp of lucuma powder or ½ tsp of raw honey (optional)

Preparation:

  • In a 10 inch skillet melt one tbsp of coconut oil and brown the shredded pumpkin until tender but not mushy.
  • Meanwhile in a large bowl mash the bananas and whisk in the eggs, lucuma and spices.
  • Add the cooked pumpkin to the bowl and mix
  • Melt another ½ to 1 tbsp of coconut oil in the skillet and pour in the batter.
  • Cook over low/medium heat until the center of the frittata is done.
  • Put the skillet under the broiler and cook until the top is cooked.
  • Serve as is or top with honey yogurt.
    Paleo sweet frittata


Entree · Vegetarian

Pisto

Spanish Ratatouille (Pisto)
//
http://pagead2.googlesyndication.com/pagead/show_ads.js

Pisto is a traditional Spanish vegetable stew served as a side dish or a tapa, similar to a ratatouille with a spanish twist. After a brief cooking hiatus while visiting my in-laws in southern Spain, I cooked again!!! While I don´t do much cooking while on vacation, I needed a Spaniard to approve of my Spanish recipe before I shared it with you.

I am on a vegetable kick, and I am currently in a small fishing town where they eat lots of fish and occasionally some Iberian pork. The problem is that I have a mild intolerance to fish. The pork here is AMAZING, how can pork taste so different from one country to another? I don’t want to create a pork recipe because it may never taste the same back in the USA. The beef here is totally different. I think it´s mostly veal.

Some friends gave us an entire leg of “Jamon Iberico.” This cured ham is made from Iberian black-hooved pigs. These pigs are allowed to roam in pasture and oak groves to feed naturally on grass, acorns, and roots. Once they become adults they are fed exclusively acorns. The hams are cured with salt for a period of time between 12 to 48 months. A total delicacy! If you ever get a chance to visit Spain you must try it, make sure the ham has a black hoof though. We thought eating an entire 24 lb ham was a gargantuan task, but it certainly will be finished before we return home, this thing is addictive! Hence my desperate need for veggies right now!

Ingredients:
2-3 tbsp of oil of your choice
2 lbs of diced tomatoes
1 medium shredded carrot
1 medium diced eggplant
1 medium diced Mexican squash or zucchini
1 medium diced red bell pepper
1 medium diced green bell pepper
1 medium diced onion
2 minced garlic cloves
1/2 tsp of cumin
Salt and pepper

Preparation:
Sauté the onions with the olive oil for 3-5 minutes
Add the tomatoes and the carrot and continue to cook for 8-10 minutes
Add the rest of the ingredients, cover and cook until vegetables are very tender (I cooked it for 20 minutes)

Optional step: Add some eggs on top 5 minutes before the pisto is done, to poach them or simply serve the pisto with a sunny side up egg on top.

For another vegetarian spanish recipe check our gazpacho recipe

Appetizer · Drinks · Soups · Vegetarian

Gazpacho, a Spanish favorite

Classic Andalusian Gazpacho

http://pagead2.googlesyndication.com/pagead/show_ads.js

Greetings from Chipiona, a small fishing village in the southern region of Andalucia, Spain! It´s been scorching hot here and what better way to refresh and replenish than drinking a cold, nutritious glass of gazpacho, drink my husband considers to be the ounce-for-ounce, healthiest food known to man or woman!

My husband was born and raised here, and contends that ounce-for-ounce, gazpacho is the healthiest food there is. (I argue that it is liver, but based on the popularity of my last liver recipe, I think I´ll stick to gazpacho for now.) In any case, gazpacho is a refreshing drink, served cold and chock full of antioxidants and other potent phytonutrients.

I am very tempted to add more herbs and spices to it.  However, in respecting tradition I will stick to the original Andalusian recipe.  Once I return home, I will experiment and add a bit of cumin or maybe even oregano.  Maybe serve it as a cold soup with some diced raw veggies or shrimp.

As far as our vacation, things have been really mellow. We wake up, eat a home-cooked “desayuno” (breakfast) at home. Afterwards, we hang out at the beach and then come back home for lunch.  There´s a saying along the lines of “When in Spain, do as the Spaniards” so lunch is followed by a mandatory siesta. Finally,  we go out for a little walk right at sunset, which happens around 10pm!  Dinner here is eaten around 11pm, so we are eating much later than we are accustomed to, but enjoying every bit of it. I am loving all the help I am getting with the girls from my mother-in-law. I could really get used to this lifestyle!

Ingredients:


2 lbs of ripe tomatoes
1 red bell pepper (seeded)
1 garlic clove
1/8 of an onion
1 medium cucumber
salt to taste
apple cider vinegar or red wine vinegar to taste ( I use about 1/4 cup)
3 tbsp of olive oil

Preparation:

  • Using a high-power blender, blend (Like a vitamix) all ingredients, except the olive oil, until smooth. If you are using a regular blender you may have to cut the veggies in smaller pieces.
  • Add the olive oil and quickly mix it in. If you blend the oil for too long the gazpacho is going to become thicker and “pinkish”


For a thinner consistency you may add water

Drinks · Vegetarian

The Original Cactus Cooler

//
http://pagead2.googlesyndication.com/pagead/show_ads.js
Although you can just peel these and eat them as is, someone wanted an idea on how to eat a prickly pear, so here it is.

According to WebMD, a prickly pear cactus is also used medicinally for type 2 diabetes, high cholesterol, obesity, colitis, diarrhea, benign prostatic hypertrophy and to fight viral infections. To combat hangovers, the extract can alleviate symptoms such as dry mouth and nausea.

As a cancer fighter, cactus pear is impressive.  In studies ,tumor growth inhibition was comparable to the synthetic retinoid N-(4-hydroxyphernyl) retinamide (4-HPR), which is currently used as a chemopreventive agent in ovarian cancer chemoprevention. (Read more about it here).

Ingredients:

4-5 cactus pears (also known as prickly pears, cactus figs or tunas)
1/2 cup of lemon juice
3 cups of cold water
Dates or raw honey or stevia to taste

Preparation:

  • Blend all ingredients together
  • Strain (optional)
  • Serve
Chicken · Entree

Rosemary Baked Chicken

//
http://pagead2.googlesyndication.com/pagead/show_ads.js

I call this recipe “My Plan B”.

It happens all the time… We invite friends over for dinner, I plan a somewhat elaborate meal; the night before, I go grocery shopping and mentally plan my day, everything seems to be ready, but the next day my daughters have a different plan, Lilah, my 3 yr old, decides to skip her nap and keep her sister awake, water the plants all by herself, draw on my wall and “reorganize” my kitchen cabinets.
By 5 o’clock, my husband is not home from work yet and it  is clear to me that it was the wrong day to make  prime rib, so I fill the sink with warm water and throw in some frozen chicken to thaw while I make myself “presentable”. Then I just set the chicken in a baking tray, quickly slice some unpeeled sweet potatoes and carrots, sprinkle some oil and spices and put everything in the oven. This whole dish preparation took less that 5 minutes and while it bakes I quickly assemble a salad and sit in my front porch with a parenting book and pretend to have a handle on everything.


Ingredients:


6 chicken drumsticks *
2 medium carrots, sliced
1 medium sweet potato or yam, cut into 1 inch squares
1 tbsp of paprika
1 tbsp of ground dry rosemary leaves**
1/2 tbsp of pepper
1/2 tbsp of garlic powder
3 pressed garlic cloves
2 tbsp of olive oil
Salt to taste


Preparation:


  • Preheat oven to 380 F
  • Combine all ingredients until the spices are uniformly spread and place into an 8 x 11 baking pan.
  • Bake for about an hour or until chicken is cooked and carrots are tender.
  • Optional step: Broil chicken until skin is crispy


*boneless chicken breast would work as well, but I like fat
**If you can’t find ground rosemary, then run the through a coffee grinder or blender until powdery
Breakfast · Desserts · Vegetarian

Apricot Chia Bars

Don’t be discouraged by the long list of ingredients in this recipe, if buy them and you follow my blog, you will find plenty of recipes to use the remaining nuts and seeds. I have them in my cupboard so I will find a use for them later

Easy to make, raw, all natural, rich in protein, calcium, vitamins, minerals and other nutrients, sweet and tasty … here is how an energy bar should be made

Ingredients:

1/3 cup of raw sesame seeds
2/3 cup of raw cashews
1/3 cup of  chia seeds
2/3 cup of unsweetened shredded coconut
12 dates (about 1/2 cup)
25 dried apricots (about 1 cup)
1 tbsp of  cacao butter or coconut oil
2 tsp of vanilla extract
4 tsp of orange zest ( grated orange peel)
1-2 tsp of orange juice
1/4 tsp of salt

Instructions:

  • In a food processor  start by blending the chia seeds for 20 seconds or  until they get somewhat powdery.
  • Add all the rest of the ingredients except the coconut and blend until creamy (this will take several minutes)
  • Add the coconut and hit the pulse button a few  times to mix.
  • Spread and flatten the dough on parchment paper to 1 inch thick.
  • Refrigerate for 2 hours.
  • Cut into bars or squares.


Store in the fridge in an airtight container